When You Upload a Video With Filmorago Does the Logo Show at the End of the Video
After you import your media files (videos, images, etc.) to Filmora, it's time to showtime the editing. This tutorial will evidence you how to arrange the clips in your timeline, clean up your footage, edit out unwanted parts, and more.
- Selecting and Searching Media Files in the Media Library
- Deleting Media Files from the Media Library
- Adding Media Files to the Timeline
- Accessing Sample Colors or Sample Intro Video
- Deleting Clips from Timeline
- Trimming Video Clips
- Splitting Video Clips
- Rotating Video Clips
- Cropping/Flipping Video Clips
- Joining Video Clips
- Copying and Pasting Video Clips
- Enhancing Video Clips
- Changing Video Playback Speed
- Creating Freeze Frames
- Zooming in/out Timeline
- Resizing Videos
- Adding Watermark/Logo to Video
- Changing Playback Quality
- Preview Render
- Ripple Edit
- Group Editing
- Closing Gaps between Videos
1. Selecting and Searching Clips in the Media Library
i. To select a single media file: click on its thumbnail.
two. To select multiple media files: printing and concur [Ctrl], and and so click the thumbnails of the media you want to select.
iii. To select a sequence of media files: click the kickoff thumbnail in the sequence, press and concord [Shift], and then click the last thumbnail in the sequence.
Note: You can detect a specific media file using the Search bar.

ii. Deleting Media Files from the Media Library
In the Media Library, right click on the clip you want to remove and select DELETE.
Note: When you delete a video clip or other slice of media from the Media Library, you are only removing it from Filmora and it won't delete it from your figurer or storage device.
3. Adding Videos and Other Media to the Timeline
Here are two ways to add together media to the timeline:
Method i: Find the video prune you want in the Media Library. Then, drag and drop it into your timeline.
Method 2: Right click the video clip in the Media Library, and yous will become:
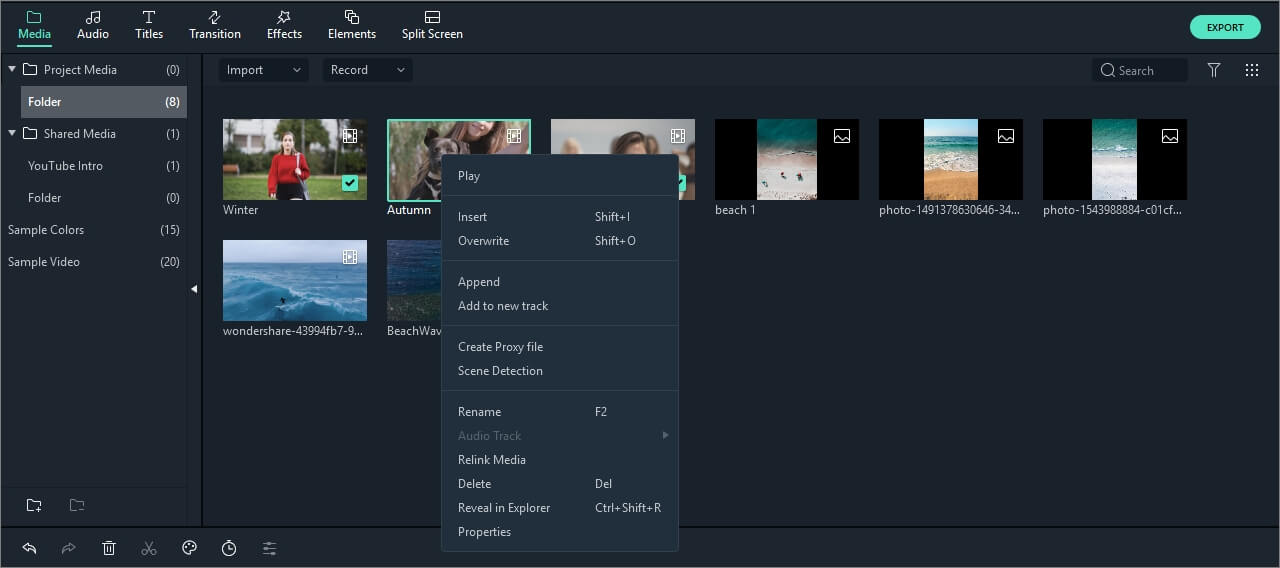
Insert: add your media to the selected runway at the playhead. Any media that is already in the rail on the correct side of the inserted media will move to the correct by the length of the inserted clip.
Overwrite: add your media to the selected track at the playhead, and supervene upon whatever media already occupying the space your added media takes up.
Append (add together to the end): add your media every bit the last slice of media in the selected runway.
Add to new track: add your media to a newly created rails which has no other media.
Note: You cannot add media to tracks with Track Lock enabled.
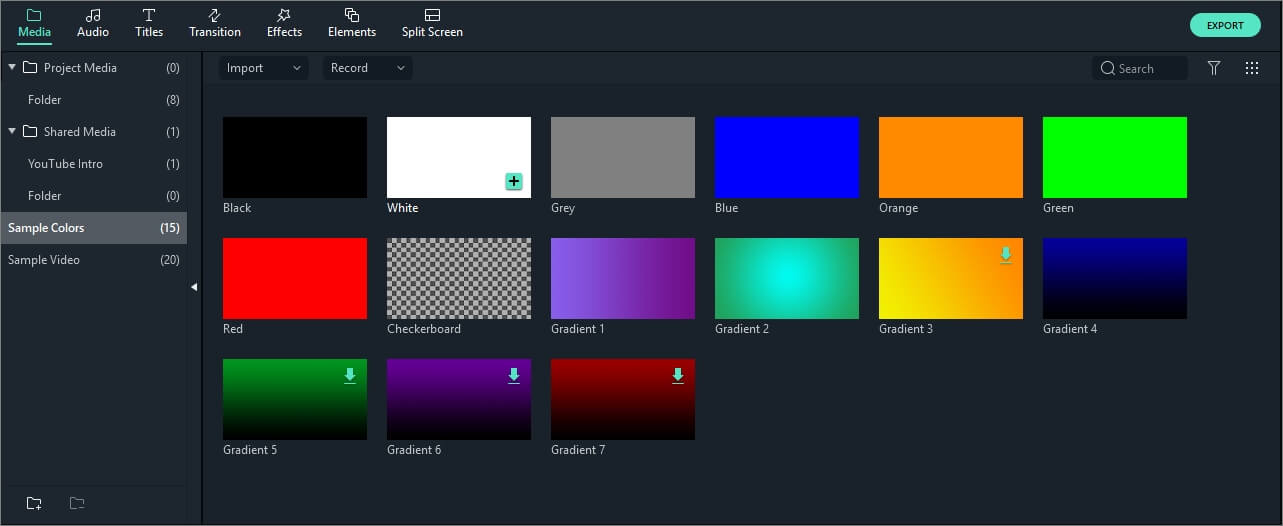
4. Accessing Sample Colors and Sample Intro Video
Filmora includes several sample colors (still images of color) and countdown intro videos. To admission these resource, click Media and choose Sample Colors or Sample Video.
v. Deleting Clips from Timeline
To delete a single video clip or other pieces of media from your timeline, right click on the media in your timeline and select Delete, select the clip and striking the Delete icon  in the toolbar, or select the prune and printing the Delete primal on your keyboard.
To remove multiple video clips or other pieces of media, printing and agree CTRL, so select the target files. When y'all are done selecting, permit get of CTRL and delete the items using the delete icon, the delete cardinal on your keyboard, or by correct-clicking and selecting delete.
Ripple Delete
Sometimes removing or deleting the video clips using the methods above volition leave a big gap in the timeline. To avert the gap, y'all can use the Ripple Delete feature.
Correct click on the clip y'all need to remove (or hold down CTRL and select multiple pieces of media, then right click) and and then select Ripple Delete to remove that clip and take the remaining media in the track move over to fill the empty space.

6. Trim Video Clips
If you need to trim from the beginning or terminate of a video clip (or other piece of media), hover your mouse over the left or right border of the clip in your timeline until the trim tool ![]() shows. Then, click and elevate the edge of your prune forwards or backwards to trim off the unwanted portion.
shows. Then, click and elevate the edge of your prune forwards or backwards to trim off the unwanted portion.

If you demand to cut out a section in the middle of a video clip, drag the playhead to the start point of the unwanted section and press the pair of scissors icon to separate the clip, then elevate the playhead to the finish of the unwanted department and printing the scissors again. At present that the unwanted section is on its ain you can select information technology and press the delete icon to remove it.

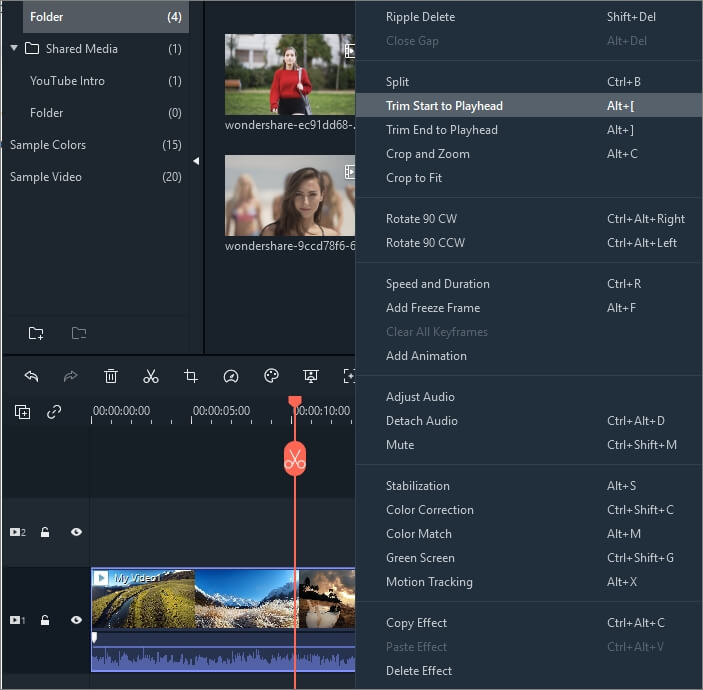
Filmora also has an option for yous to 'quick trim' from the starting time or end of a clip. In the timeline, identify the playhead on the frame you desire to trim to, correct click on the clip, and select Trim Beginning to Playhead or Trim End to Playhead depending on whether you want to delete what's behind the playhead or in front of information technology.
7. Splitting Video Clips
Separate a clip manually on the timeline:
1. Drag the playhead to the position where you lot want to carve up one or more than clips and click the Carve up button (the red scissor icon) on the playhead to create the separate.
Note: If you don't select a specific rails in your timeline, you volition split all of the clips under your playhead. To split media in a unmarried runway, you lot need to select the track first and so click the Divide icon.

2. You can also identify the playhead at the position where you want to split the clip, right-click, and cull Separate.
Annotation: If you don't like the ruby-red scissor push, you can go to File -> Preferences -> Editing to hide it.
![]()
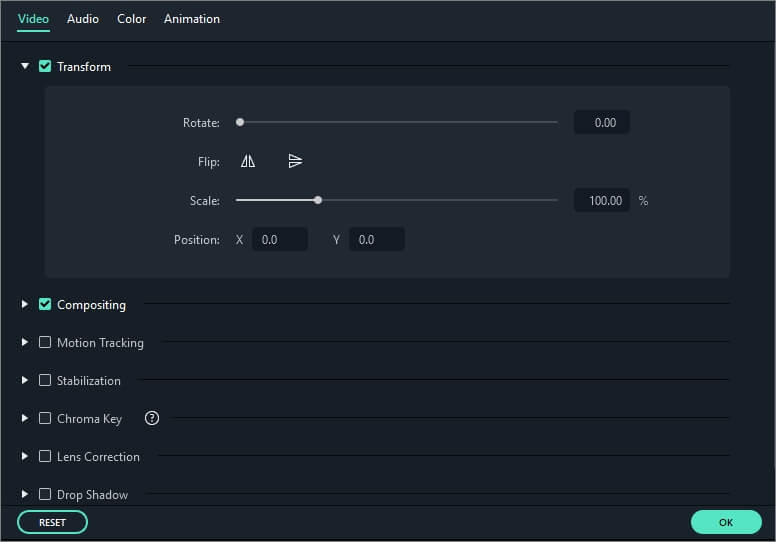
8. Rotating or Flipping a Video Clip
To rotate or flip a clip:
ane) Double click the prune in the Timeline.
2) In the popup Video panel, choose the Transform.
3) To rotate the clip, drag the rotate slider to the right or enter a numerical value in the rotate section to rotate the video equally you want.
iv) In the Flip department, click the Flip Horizontal icon to reverse the clip from left to right, or click the Flip Vertical icon to turn the clip upside downward.

Click Reset to disengage your changes or OK to use the consequence to your video.
Note: If you lot want to convert horizontal to portrait without cropping off the acme or the bottom, you should correct click on the clip in the timeline and select Rotate 90 CW or Rotate 90 CCW straight. In this way, Filmora will rotate the video without cropping.

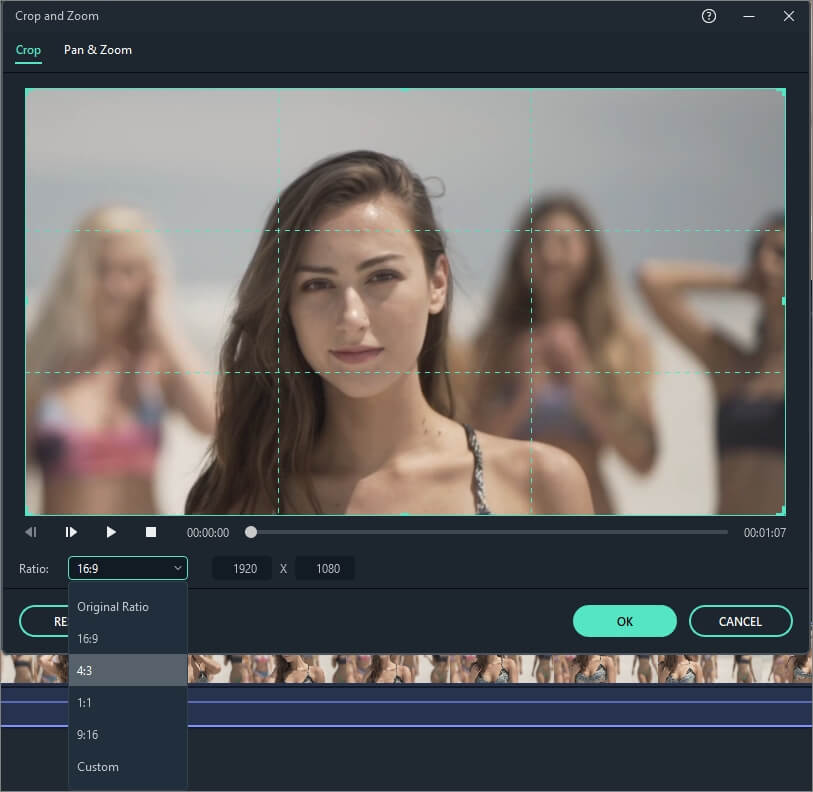
9. Cropping Video Clips
Follow the steps below to ingather out and zoom into parts of your video clips:
i) Right click on the clip in the timeline
2) Select the Ingather and Zoom option from the menu or click the Crop icon  to open the Crop and Zoon panel.
iii) In the popup window, move and adjust the rectangle to surround the area you want to crop. You can also choose the preset from the post-obit preset dimensions: xvi:nine, iv:iii, ane:1 or 9:sixteen. Or you lot can select Custom to crop the video with your ain ratio.
10. Joining Videos
You can use the Bring together feature when you take several video clips in a sequence and desire to combine them into i clip. To join videos clips, identify them to the Timeline in the sequential lodge you want. They will exist joined or combined every bit one video after export.
11. Copying & Pasting Video Clips
When you copy and paste clips in Filmora'southward timeline, the spacing of the clips is kept. Y'all tin paste copies of clip at the end of your video or insert them at the location of the playhead.
Step 1: Select ane or more clips in the sequence, right-click, and cull Re-create.
Pace 2: In the timeline, position the playhead at the indicate where you want to paste a copy of the clips.
Stride iii: Right click and choose 'paste'.
Note: If there are clips in the track before y'all paste, they might exist overwritten by the pasted clips.
12. Enhancing Video Clips
Enhance your video clips by adjusting the white residue, tone, color, light, and HSL and by adding vignettes.
Double click the target clip in the timeline to enter the Edit panel, and select Colour menu, the window will bear witness as below:

Drag the sliders respectively to adjust your color temperature, tint, contrast, saturation and brightness. You can also enter a numerical value if you lot know the verbal adjustment yous want to make. There are also 3D LUT effects available if you want to modify the entire look of your video at once. Scout the Preview Window to see how the new settings touch on the expect of your video.
Click Advanced to enter the Accelerate Color Tuning console where you'll find presets as well as options to customize your colors, lighting, hues, saturation, luminance, vignettes, etc.
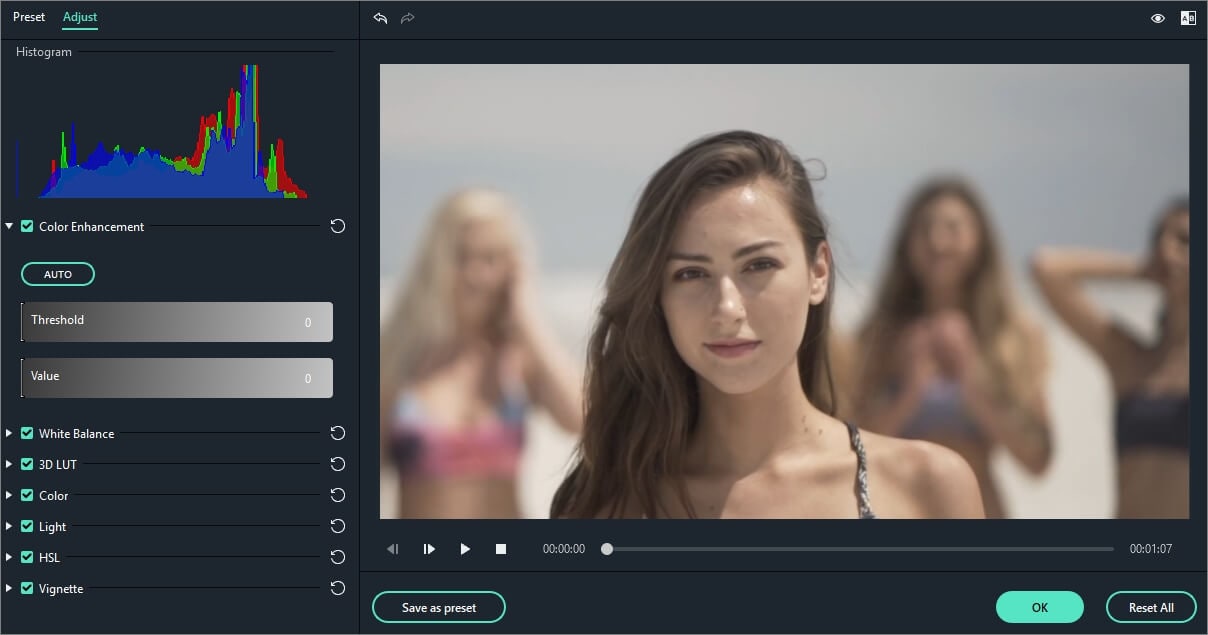
You lot can too enter the Advanced Color Tuning window past right-clicking a clip and and then selecting Color Correction or clicking on the Color icon in the toolbar.
xiii. Changing Video Playback Speed
There are three ways to speed up or boring downwardly a video clip in Filmora:
Method 1: Using the speed and duration settings:
Correct-click on your prune in the timeline and select Speed and Duration to open the Custom Speed window. Elevate the speed slider to adapt the speed of the video clip. You tin can besides enter the precise video duration you lot want in the speed field. It will change the speed accordingly.

Notation: the Reverse Speed option ways to play the video backward.
Method 2: Using the custom speed panel:
Click the Speed icon ![]() in the toolbar. You'll see options to slow downwards, speed up, or opposite the video. You can as well return it to its normal speed if it has been contradistinct. Filmora offers speed control presets so you can rapidly dull your clip to 0.5x, 0.25x, 0.1x, 0.05x, or 0.01x the speed or speed it up to 4x, 8x, 20x, 50x or 100x faster.
in the toolbar. You'll see options to slow downwards, speed up, or opposite the video. You can as well return it to its normal speed if it has been contradistinct. Filmora offers speed control presets so you can rapidly dull your clip to 0.5x, 0.25x, 0.1x, 0.05x, or 0.01x the speed or speed it up to 4x, 8x, 20x, 50x or 100x faster.

Method 3: By manually dragging the video:
Press the Ctrl button on your keyboard, and then hover the mouse over the end of a clip. You will encounter a round speed change icon.
While holding downwards the 'Ctrl' push button, drag the edge of the clip backward to slow downwards the prune or forwards to speed it up.
Afterwards you irksome down the clip, you will see a purple strip showing the speed alter.

After yous speed up the clip, y'all will see a red strip showing the speed change.

14. Creating Freeze Frames
A freeze frame is a still paradigm representing a single frame of your video clip. Normally, freeze frames are used to make it seem like time has stopped at a specific moment in your video. Here's how to create a freeze frame in Filmora:
- In the timeline, movement the playhead to the frame you desire to freeze.
- Click the speed icon
 in the toolbar and select Freeze Frame.
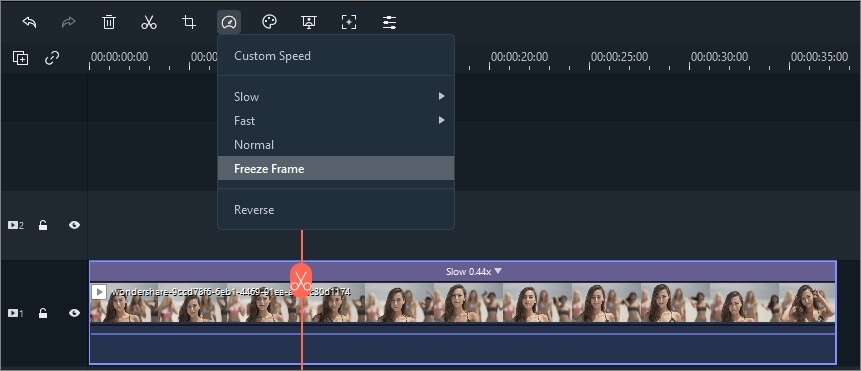
- Set the duration of the freeze frame by dragging its border. You tin can also change the default duration freeze frames past going to File -> Preferences -> Editing.

xv. Zooming in and out Timeline
To zoom in or out and run across more or less (in more item) of your timeline, use one of these methods:
xvi. Resizing video clips
If y'all need to resize a video clip, drag and drib information technology into the timeline to cut out function of the video. Or, you tin change the resolution, frame rate, and bit rate in the consign window to lower the file size. If you demand to change the display size of a video, use the Scale slider.
To admission the Scale slider, right click on the video prune y'all demand to resize in the timeline choose Show Properties (Edit), and click into the Video tab in the popup window. Go to Transform and drag the Scale slider to the right or the left to resize the video clip. Y'all can also enter an exact value if you know the exact percentage yous want to scale to.
Click to cheque the details of how to resize video files.
17. Adding watermark/logo to the video
If you want to add a watermark/logo image to your video in the timeline, drag and drop the watermark/log to the video track (i.east Track 2) above the rails (i.east Track 1) that places your video.
Yous can resize the watermark/logo image in the Preview Window by adjusting the pocket-size circles and squares at its edges, and motility it to where you want in the Preview Window.
To adjust the opacity or blending fashion of your watermark or logo (i.e. go far transparent), double click the logo prototype in the timeline to open up the Image panel and go to Limerick. From there you can choose a composition mode (i.eastward. darken) and utilise the Opacity slider to conform your transparency.
![]()
xviii. Playback Quality
You lot tin can adapt the playback quality of the Preview window for a smoother editing experience. For example, you lot can improve the performance of your preview by playing your video at a lower resolution than you want for your finished project or by creating proxy media files to edit with.
Proxy files are more manageable versions of your clips that are easier to edit with considering they are smaller in terms of data (i.due east. they are at a lower resolution). You lot can edit with a proxy file in Filmora, then export with your full-sized original clip.
Setting Playback Quality
If Filmora detects lags, it will prompt a message to ask you to lower playback quality.

Reducing your playback quality can eliminate lags and save yous time. Click the playback quality control carte du jour, and and so choose from these options:

Full: preview your video without changing the original resolution
1/ii: preview your video at 1/2 the original resolution
1/4: preview your video at ane/four the original resolution
one/viii: preview your video at i/8 the original resolution
1/sixteen: preview your video at i/16 the original resolution
Annotation: the reduced playback resolution just applies to the video preview and will not bear on the export settings.
xix. Preview Render
Preview rendering reduces the preview lag which can occur when editing complex or high resolution projects. This results in smoother playback. Filmora offers two ways to render your timeline preview:
Transmission Render (The Render Push button)
Click the Render Button to begin rendering your timeline whenever this carmine line appears (equally when yous add together media or make other changes to your timeline).

The render preview window will pop up, showing the return progress and the estimated remaining fourth dimension.
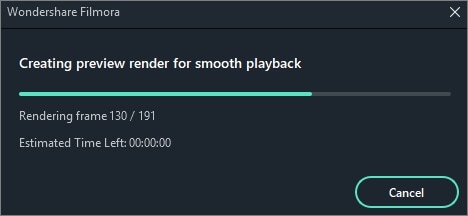
Once the rendering is complete, the red line will turn green.
Notation: you lot volition need to look until the rendering procedure is finished to keep editing.
Car-Render
Also manually clicking the Render Button, you can besides use a feature called Background Return. If you enable it, your videos will be rendered automatically when you add your videos to the timeline for editing. You can go to File-Preferences-Functioning, set a outset and enable it. By default, the render process will be performed later 5 seconds of inactivity on the timeline.
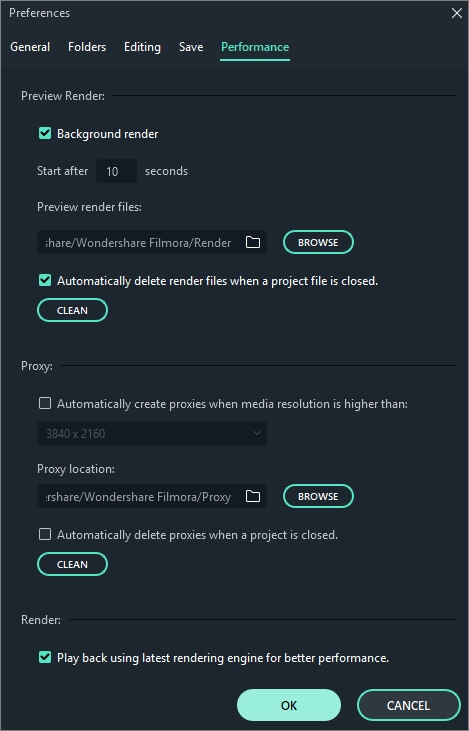
Click OK to save your settings.
Note: The rendered parts of your timeline will be indicated by a green line. The line will be red for the united nations-rendered parts. Once you lot change, modify, or add furnishings to the rendered section you'll observe the line turning red to point you lot need to render once again.
20. Ripple Edit
Click the Auto Ripple button to turn on ripple editing. This volition allow you to trim, add, and delete clips without leaving a gap in your timeline. If you add new media in the middle of your timeline all of your clips and furnishings will exist shifted to the right to accommodate the new addition.
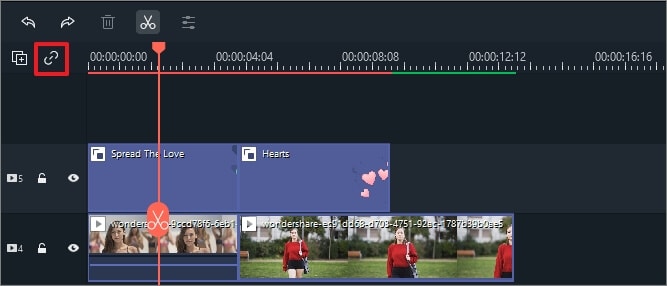
When motorcar-ripple is on you can automatically delete all of the effects applied to a clip when you delete the clip itself. Turn on auto ripple, select the video clip, right click, and choose Delete.
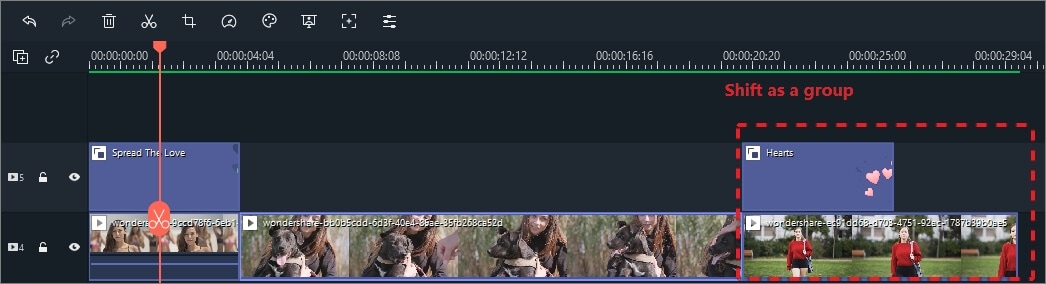
21. Group Editing
Filmora allows you to link clips together as a group so you lot tin movement them without irresolute the positions relative to each clip within the group.
How to group clips
To combine multiple clips into a group, hold the Ctrl key on your keyboard and click the clips that you want to grouping in the timeline. And then, right-click the clip and select Group from the context menu.

Ungrouping Clips
To unlink your grouped clips, right-click one of the grouped clips in the timeline and select Ungroup.
Likewise using the group feature, yous can at present mark the clip in the same color. Currently, you can marking the prune with eight colors, including cherry, orangish, yellow, dark-green, Cyan, blueish, purple, gray and white.
Right click on the clip and select the choice Select all clips with the same color marker, all clip in the same mark volition be selected automatically, and then you tin can drag them as a group.

22. Closing Gaps between Videos
Sometimes there volition exist gaps between clips later on you delete media on the timeline. To remove these gaps, offset yous need to select all the videos with your mouse.

Then, right-click and select Close Gap

All the gaps will be removed.

Source: https://filmora.wondershare.com/guide/editing-video.html
0 Response to "When You Upload a Video With Filmorago Does the Logo Show at the End of the Video"
Post a Comment